
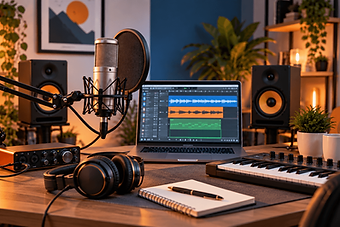
Building a home recording studio can seem complicated when you first start. There are microphones, audio interfaces, headphones, studio monitors, MIDI controllers, recording software and countless accessories to choose from.
The good news is that you do not need everything at once.
A simple beginner setup can be built around a computer, audio interface, microphone, headphones and recording software. You can then add extra equipment as your skills and needs grow.
This guide explains what you really need, what can wait and how to build a practical home studio without spending more than necessary.
What do you need for a beginner home recording studio?
For most beginners, the essential equipment is:
A computer
An audio interface
A microphone
Studio headphones
Recording software
The necessary cables and stands
That is enough to record vocals, guitars, keyboards and many other instruments at home.
You can add studio monitors, MIDI controllers, acoustic treatment and other equipment later.
Start with the computer you already have
You do not need to buy a new computer just because you are starting to record music.
Most modern laptops and desktop computers are capable of running beginner recording software.
The important things are:
Enough memory to run your recording software comfortably
Enough storage for your projects and audio files
Suitable USB or other connections for your audio interface
A reasonably modern processor
If your existing computer works reliably, use it first and upgrade only when you actually need to.
Choose an audio interface
An audio interface connects microphones and instruments to your computer.
It converts the incoming audio signal into digital audio your recording software can use.
For a beginner home studio, a simple interface with one or two microphone inputs is often enough.
Useful features include:
XLR microphone inputs
Instrument inputs
48V phantom power for condenser microphones
Headphone output
Direct monitoring
Monitor speaker outputs
If you are choosing your first interface, see our Best Audio Interfaces for Beginners guide for more detail.
Choose your first microphone
Your microphone will depend on what you want to record.
A condenser microphone is often a good choice for:
Vocals
Acoustic guitar
Piano
Voiceovers
Softer acoustic instruments
A dynamic microphone can be a better option for:
Louder vocals
Guitar amplifiers
Untreated rooms
Noisier recording environments
You do not need several microphones when starting out. One versatile microphone can cover a surprising number of recording situations.
See our Best Microphones for Beginners guide if you want help choosing between condenser, dynamic, USB and XLR models.
Add a pair of studio headphones
Headphones are essential for most beginner studios.
They allow you to hear your backing track while recording without the sound being picked up by the microphone.
For a first pair, closed-back headphones are usually the most practical choice.
Look for:
Good comfort
Reasonably neutral sound
Good isolation
A wired connection
Compatibility with your audio interface
Our Best Studio Headphones for Beginners guide explains what to look for in more detail.
Choose recording software
Recording software is usually known as a DAW, or Digital Audio Workstation.
A DAW allows you to:
Record audio
Edit performances
Use plugins and effects
Arrange songs
Mix your tracks
Export finished recordings
There are many excellent DAWs available, including free and lower-cost options.
When you are starting out, ease of use is usually more important than having the longest feature list.
Some audio interfaces also include basic recording software, which can be a good way to begin.
Do you need studio monitors?
Not immediately.
Studio monitors are speakers designed for recording and mixing.
They can be very useful, but a good pair of headphones is enough to start learning.
If you are working in a small or untreated room, headphones can sometimes be more useful than inexpensive speakers because they remove the influence of poor room acoustics.
Studio monitors can be added later when your budget and workspace allow.
Do you need a MIDI controller?
A MIDI controller is useful if you want to play virtual instruments such as:
Software synthesisers
Piano sounds
Drum instruments
Orchestral instruments
Sample libraries
A small MIDI keyboard can make music production much easier.
However, it is not essential if you mainly plan to record vocals, guitar or other real instruments.
This makes it another piece of equipment you can add later.
What cables and accessories do you need?
Small accessories are easy to forget when budgeting.
Depending on your setup, you may need:
XLR microphone cable
Microphone stand
Pop filter
Shock mount
Headphone adaptor
USB cable
Instrument cables
Extension leads
Desk or monitor stands
Some microphones and audio interfaces include cables or accessories, while others do not.
Check what is included before you buy.
Do you need acoustic treatment?
You do not need to cover your room in acoustic foam before making your first recording.
However, the room does affect the sound your microphone captures.
A bedroom or spare room can often be improved using things you already have.
Soft furnishings can help reduce reflections, including:
Curtains
Rugs
Carpets
Sofas
Beds
Bookshelves
Try to avoid recording in empty rooms with lots of bare walls.
Proper acoustic treatment can be added later if it becomes necessary.
Where should you put your home studio?
The best location is usually somewhere quiet where you can leave your equipment set up.
That could be:
A spare bedroom
A corner of a bedroom
A home office
A loft
A dedicated music room
Try to avoid areas next to noisy roads, washing machines or other sources of constant background noise.
You do not need a large room. A compact desk setup can work very well.
How should everything connect?
A basic home studio setup is straightforward.
For recording with a microphone:
Microphone → Audio interface → Computer
Your headphones connect to the audio interface.
If you later add studio monitors, they also connect to the outputs on the interface.
If you use a MIDI keyboard, it will usually connect directly to your computer by USB.
How much should you spend on a beginner studio?
There is no single correct budget.
The most important thing is to balance your spending across the whole setup.
It is usually better to buy several sensible entry-level products than spend most of your budget on one expensive microphone or interface.
A beginner budget should prioritise:
Audio interface
Microphone
Headphones
Essential accessories
Recording software if required
Studio monitors, MIDI controllers and additional microphones can come later.
What should you buy first?
If you are starting completely from scratch, a sensible order is:
Use the computer you already own
Choose an audio interface
Add a suitable microphone
Buy closed-back studio headphones
Install your recording software
Add the necessary cables and microphone stand
Start recording before buying anything else
This approach helps you avoid spending money on equipment you may not actually need.
Avoid buying too much too soon
One of the easiest mistakes to make is thinking you need a fully equipped studio before you can start.
You do not.
Learning how to use a small amount of equipment well will usually improve your recordings more than buying lots of extra gear.
Start simple, learn how your microphone works, understand your audio interface and become comfortable with your DAW.
You will then know much more clearly which upgrades are genuinely useful.
A simple beginner home studio setup
A practical first setup could include:
Laptop or desktop computer
Two-input audio interface
One versatile XLR microphone
Closed-back studio headphones
Microphone stand
Pop filter
XLR cable
Beginner-friendly DAW
That is enough to make high-quality home recordings and learn the fundamentals of music production.
Our advice for beginners
Do not try to build your dream studio on day one.
Build a studio that lets you start recording.
Choose reliable equipment that fits your current needs, keep the setup simple and concentrate on learning how everything works together.
You can always add better microphones, studio monitors, MIDI controllers, plugins and other equipment later.
Final thoughts
A beginner home recording studio does not need to be expensive or complicated.
A computer, audio interface, microphone, headphones and recording software give you everything you need to start recording music at home.
The most important step is simply to begin.
Once you have made a few recordings, you will quickly discover which parts of your setup matter most to you and where future upgrades will make the biggest difference.